Set up Power BI SQL Connection for ConnectWise Cloud or Self-Hosted
There are several guides out there for setting up an API-based connection to your ConnectWise Manage/PSA data in Power BI. However, there seems to be a lot of confusion on how to set up a SQL-based connection for Direct Query in Power BI or even whether it’s possible. As of this writing, the official University documentation still mentions installing an ODBC driver and connecting in a roundabout way–this is totally unnecessary and limits what you can do.
In order to connect to your SQL data source in Power BI Desktop, all you need to do is choose SQL as the data source within the application and enter your database server address, database name, and credentials. In this post, I’ll go over this as well as how to set up an on-premise gateway if you want to collaborate on reports on the Power BI online service. If you’d like NexNow to take care of the setup for you for a small one-time fee, feel free to reach out here.
Prerequisites
SQL Access (cloud SQL or self-hosted)
In order to connect via SQL, you will need to either be self-hosted, ConnectWise Premium, or purchase the cloud ODBC add-on (as of this writing, your account manager can add this to your account for between $50-200/month). If you are self-hosted, you may want to set up a replicated reporting database in order to prevent negative performance impact on your production database.
Power BI Pro account
The gateway will need to be logged in with a 365 account with Power BI (free is fine) and a Pro or higher Power BI account is required to publish and access reports in shared workspaces. Pro licenses are usually available for Microsoft partners. An alternative to everyone having a Pro account to collaborate is to publish the reports in a Premium capacity, eliminating the license requirement on the user side. Shared accounts work if you are short on Pro licenses and your access requirements are similar (e.g. a shared service@mycompany.com account for access to helpdesk reports).
Installation
The following applications are required. The gateway and Power BI desktop can be on different machines, but they should both have direct access to your SQL database (if cloud, that just means internet access and database URL / login details).
- On-Premise Gateway (Standard Mode. See here for latest requirements.)
- Power BI Desktop
- (Highly Recommended) SQL Server Management Studio, PopSQL, or another SQL editor. You do not want to manage complex SQL code inside of Power BI Desktop.
Gateway Setup
Install the gateway with the default options, creating and saving a recovery key for future reinstallation (you can quickly reinstall on a temporary machine or just start over on a new machine with the recovery key rather than restoring a server). Log into it with the Power BI account you want to use for managing the gateway. This can be the same as an account you use for publishing reports.
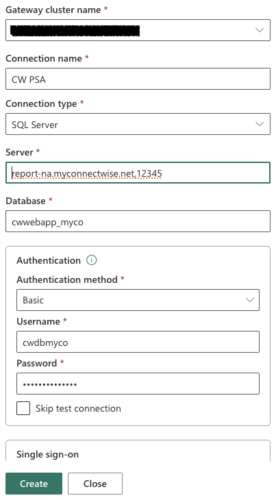
Log in with your gateway account at app.powerbi.com and go to Manage Connections and Gateways. Click New and enter a name for your CW SQL connection. Choose SQL Server as the connection type and then you should have options for Server, Database, and Authentication. Choose Basic Authentication and enter your database reporting user name and password.
Setup should look similar to below. If you are self-hosted, your database should be the local name or IP of the database server. For cloud, make sure you format exactly as below with a comma (not a colon) before the port number.

Publishing a Report
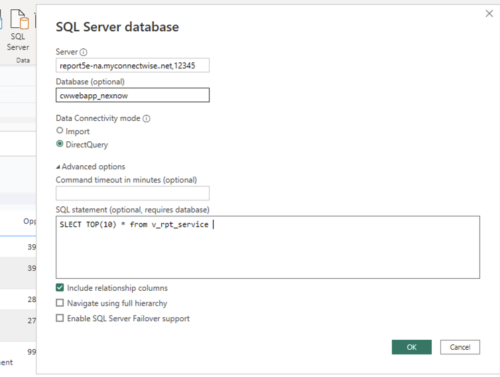
Open Power BI Desktop and click the SQL Server button on the main ribbon bar to connect to a new SQL datasource. Enter the server location and database name, select DirectQuery (I sometimes use Import method for more complex reports but that’s another discussion). You can then either click Enter to go to a list of tables and views or go to Advanced options and enter in your SQL code (perhaps from Report Writer). If I’m joining multiple data sources together in Manage, usually I create a SQL query that does that efficiently, rather than taxing Power BI with the work.

Next, a box will pop up requesting login info. Sign in with your database credentials.
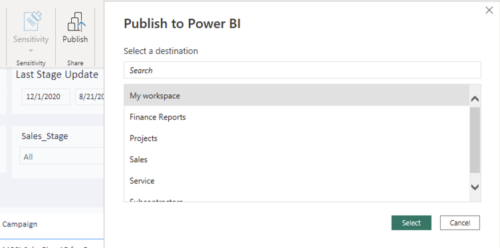
It’s beyond the scope of this post but once you’ve added your visuals and field and are ready to publish your report, click the Publish button (this should prompt you to sign in to 365 if you are not already). If you only see My workspace here, you will want to first go and create some company workspaces so you have one to publish to.

Examples
Here are a few examples of what you can do in Power BI.


Want to do more?
Contact us for one-on-one help or connect with us on the ConnectWise subreddit or the ConnectWise University Forums.