Create a Report Cover Page in ConnectWise Report Writer Using Custom CSS
If you’ve been creating custom HTML reports in ConnectWise for a while, you’ve probably noticed that while you can do a lot of powerful things, the interface and the lack of advanced documentation can make things difficult. One recent challenge was to create a report cover page in ConnectWise Report Writer. One report element I spent a bit of time mastering was a title page with a static background image with different text overlaid for each client. When a ConnectWise update caused Report Writer to strip out the table background image we were using for the page, I needed to figure out a new solution that CW liked.
Defining a custom CSS class for your background image
After some trial and error, I figured out that CW will allow a table background image if you define it first in a custom CSS class and then reference that class within your HTML. I will walk through the steps for this particular report for Riopel Consulting but you can find more details about custom CSS classes here in the CW documentation.
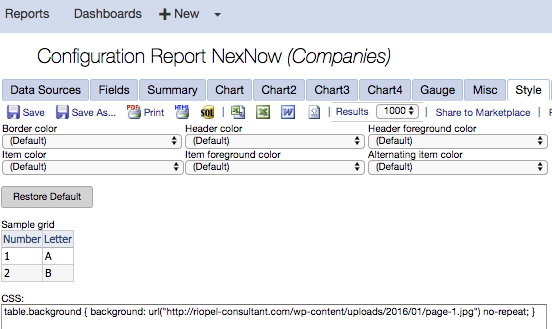
First, go to the Style tab and enter the code with your image URL in the CSS box.

table.background { background: url(“yoururl/yourimage.png”) no-repeat; }
Create a table and reference your CSS class
Next, create a table in the WYSIWYG editor to help you line up the text (I used 3 columns and 13 rows here–pick a number and adjust later until you’ve lined up your text just right). Then, go into your HTML and give the table the same dimensions as your image (Riopel used 1300×1682). Make sure there aren’t any visible borders on your table cells (you may want to leave them on while you’re editing and than remove them once everything is lined up).
Note below that I’m using the “background” tag within <TABLE>. It will get stripped out upon save but will work while you’re doing your edits. If you don’t do this, the preview will not show the image you’re referencing with CSS so you’ll just see a big blank area, making it difficult to get your text in the right spots. You should end up with something like this above all the lines for your table rows:
<table class=”background” style=”width: 1300px; height: 1682px; font-size: 20px” background=”http://riopel-consultant.com/wp-content/uploads/2016/01/page-1.jpg”
data-mce-style=”width: 1300px; height: 1682px; font-size: 20px;”>
<colgroup>
<col width=”25%”>
<col width=”50%”>
<col width=”25%”>
</colgroup>
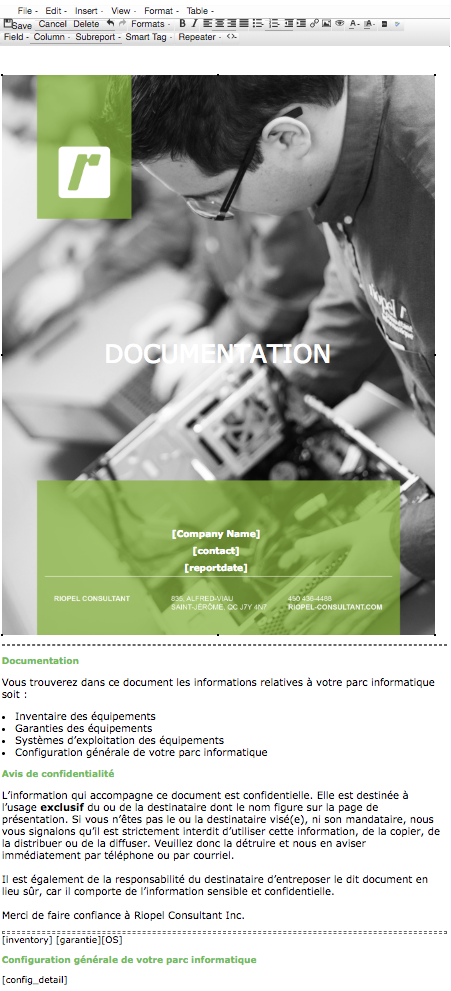
Here’s how it looks in the WSIWYG editor for Riopel’s Configuration Report (after adding text for DOCUMENTATION, [Company Name], [Contact], [reportdate]).
Below the title page, I added page breaks so the PDF will show everything between the horizontal lines on a separate page, including each subreport.

Once you’ve got your background image placed and your table underneath, you can click around and add your text in the appropriate spots using the WYSIWYG editor. Once you’ve lined things up, you may want to use the built-in HTML editor or your favorite HTML editing tool to clean things up as Report Writer will tend to add a lot of unnecessary things.
Final note
Even if you’ve been using Report Writer for years, you’ve likely just scratched the surface of what it’s capable of. I recently found this article from Izena (Report Writer is actually a product called Izenda) with a few other things I’m eager to try. Stay tuned for more.
Want to do more?
Now you can create beautiful reports with a Report Writer cover page. Do you want to do more of your own ConnectWise reporting in Report Writer, Power BI, or another reporting tool? Contact usfor one-on-one help or connect with us on the ConnectWise subreddit or the ConnectWise University Forums.