Setting Up Your Public/Private API keys in ConnectWise Manage
3rd party developers are updating their apps to take advantage of the new ConnectWise REST API. There are a couple steps partners need to take to get set up with the new method. Essential to every integration is the public/private ConnectWise API key creation within the Member setup area of ConnectWise Manage. When you are asked to set up your public and private keys for an integration, these are the steps to take:
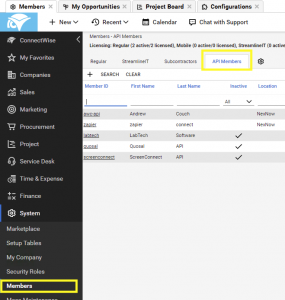
Open the CW Manage desktop app (not the web version) and log in with an account that has access to the Members Screen:

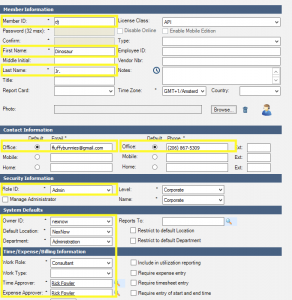
Click + to create a new member. Then, you will need to include several details as if they are a regular user. Answers you must enter are:
- Member ID
- First Name, Last Name
- Default Email, Default Phone
- Security Role ID (we recommend you use a security role with the least access for this)
- Security Level, Name
- System Defaults for Owner ID, Default Location, Department
- Time/Expense/Billing Info for Work Role, Time Approver, Expense Approver
- Default Sales Territory

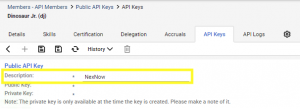
After you click Save, the API Keys tab is selectable. Click + to add a new one then enter a description and click Save.

Once saved, the Public Key and Private Key will generate. Keep the private ConnectWise API key safe in your password manager or other secure location as it will not be visible again after closing this window.
Want to do more?
Do you want to do more of your own ConnectWise reporting in Report Writer, Power BI, or another reporting tool? Contact us for one-on-one help or connect with us on the ConnectWise subreddit or the ConnectWise University Forums.