How to Customize Your Own Standard Report in ConnectWise
ConnectWise comes with some useful built-in reports. However, there are usually a few things MSPs want to tweak so that each report fits their specific requirements. Report Writer is a great tool for this–if the report is available there, that is.
As it turns out, a lot of standard reports either aren’t included in Report Writer or reference stored procedures in the database that you can’t access via Report Writer.
Here’s how you can make your own version–a customized standard report for use in CW right alongside the built-in ones.

Example Report: Changing SLA Priority Report to look at Closed Date rather than Entered Date
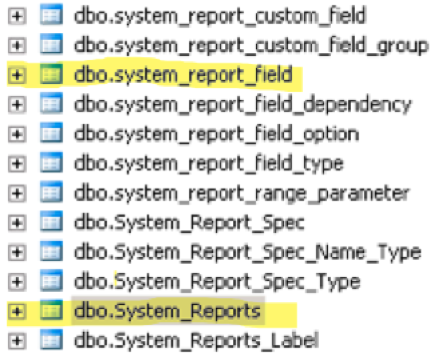
To illustrate, I will use the SLA Priority Report in ConnectWise. With it, you can select the start/end date based on the date the ticket was created (Date_Entered). We want to make a version that searches based on closed date (Date_Closed).
Figure 1.1
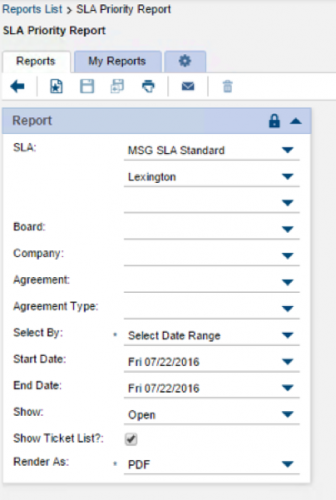
Depending on which report you’re copying, your steps may vary, but here are the tables you’ll be looking at (we’ll be adding rows to the highlighted ones in our example):
Figure 2.1
3 Steps to a Custom Report
Step One: Create copy of report on report server
In addition to these tables, we’ll also need to go into the report server and create a copy. One way to do this is to visit http://localhost/Reports on the ConnectWise server, click Details View in the top right corner, select the folder that matches your CW database name (e.g. “nexnow”), and go to the Service Tickets folder.
Here, we can select the report SLAPriority and choose to edit it in Report Builder.
Figure 3.1
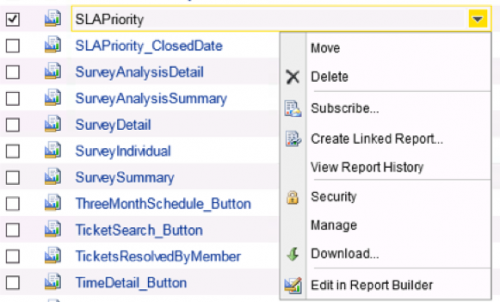
Before I do anything else, I’ll Save As and rename the report. I renamed this one to SLAPriority_Closed. Now if I accidentally just hit Save, I’m not modifying the built-in report.
Step Two: Find and modify any relevant stored procedures
Once you’re in the report, expand the Datasets. The one that looks interesting here is SLAPriorityResults. Going into it Properties page, we see that it references usp_report_SR_SLAPriorityDetail.
Figure 4.1
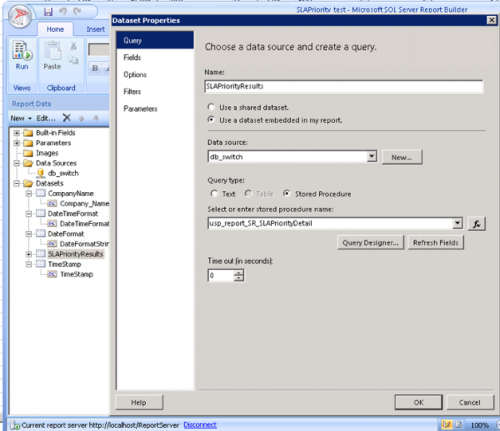
Under cwwebapp>Programmability>dbo.usp_report_SR_SLAPriorityDetail in SQL Management Studio, do a Script Stored Procedure as > CREATE TO > New Query Editor Window and let’s take a look at that procedure.
Figure 5.1
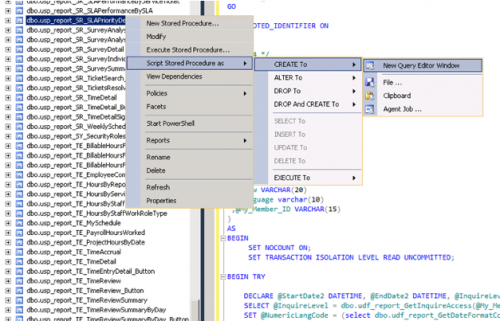
There’s a lot going on here and you may want to enlist the help of a SQL savvy individual. For this particular stored procedure, it turns out there’s no reference to Date_Closed. In this example, a simple Find/Replace of Date_Entered for Date_Closed is all that needs to happen. When you’re ready to save the modified procedure, append “_Closed” to the procedure name on the CREATE PROCEDURE line then Execute.
Figure 6.1

Now that we have our new procedure, we can go back to Dataset Properties (Figure 4.1) and select our new procedure instead. Before hitting Save, you’ll probably also want to rename the form field from “Entered Date” to “Closed Date.”
Step Three: Adding the database tables for the report
Now that we’ve got everything set up, we need to get this report to show up in the ConnectWise GUI. The first table you’ll want to modify is System_Reports. In that table, look up the existing report by the Report_Name field to find the System_Reports_RecID. You’ll want to add an identical row, replacing only:
- Report_Name (to append “Closed”)
- Report_Link (same title as your new report on the report server)
- Description
- Spec_Description
- Spec_Purpose
- Last_Update
- Optional: Updated_By
Now, if you try to look at the report in the GUI, you’ll see there are not yet any options to select. To get those, we need to add some rows to the system_report_field and system_report_field_option tables.
Here are the rows we need to copy in system_report_field, substituting the System_Reports_Recid of the existing report (in my case it was 154–yours may be different) to the RecID of our new report.
Last, we need to use the System_Report_Field_Recid of the row with Parameter_Name of “Show” (1398 here) and look it up in the system_report_field_option table.
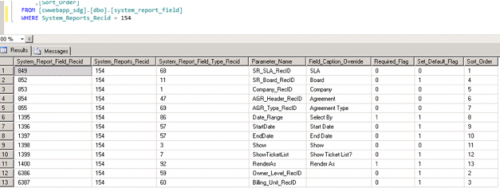
Create similar rows using your new System_Report_Field_Recid (you may find you want to do it slightly different in this case since we’re only looking at closed tickets).

Now your new “Standard Report” is available in ConnectWise!
Do you have any great examples of CW reports you’ve modified or any that you’re stuck on? Let us know in the comments.
Want to do more?
Do you want to do more of your own ConnectWise reporting in Report Writer, Power BI, or another reporting tool? Contact usfor one-on-one help or connect with us on the ConnectWise subreddit or the ConnectWise University Forums.
