Client Distance Calculator for ConnectWise
6 Dec 2012: I’ve updated the Client Distance Calculator for ConnectWise. Check out the most recent post on this topic and download the latest version of the calculator.
I recently wrote about how ConnectWise allows you to set up standard mileage expense reimbursements for your client sites. The idea is that you calculate the distance between your office and each of your client’s sites and then enter this distance on the sites tab for each company. Once complete, ConnectWise auto-magically populates this distance each time your staff enters a mileage reimbursement on their expense report.
Overall, the approach works well – it saves your staff time when entering expenses and also creates consistency by establishing standard distances (and therefore mileage reimbursements) for each client that your entire staff can use. But initially calculating the distances can be quite time consuming for even the most modest of sized ConnectWise partner. So, on a rainy weekend a few weeks ago, I decided to see if I could automate this part of the process.
Overview
Introducing the Client Distance Calculator for ConnectWise, a .NET-based application I wrote. It first retrieves your client data using the ConnectWise API and then uses the Google Maps API to calculate the distance between your address and each of your client sites.
Create integrator login
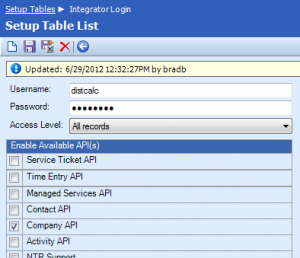
To use the calculator, the first thing you’ll need to do is create an integrator login within ConnectWise:
- Open ConnectWise and navigate to Setup > Setup Tables.
- Find the Integrator Login setup table.
- Click the New
 icon and create a new integrator login with the following properties:
- Username & password: your choosing
- Access Level: All Records
- Enable Available API(s): Company API
- Click the Save
 icon.
icon.
Using the calculator
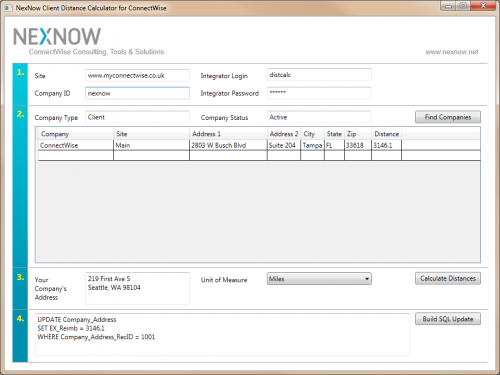
- After you’ve downloaded, extracted and launched the calculator, you’ll need to enter the following information so it can connect to your instance of ConnectWise via the API:
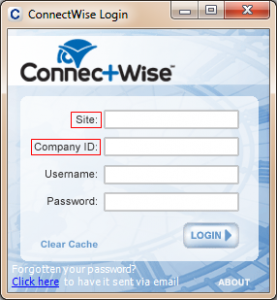
- Site (without the http:// or https:// prefix) & Company ID: enter your ConnectWise site and company ID, both of which you can find on your ConnectWise login screen.

- Integrator Login & Password: enter the integrator login and password you created in the previous step.
- Company Type & Status: enter an appropriate type and status combination, such as “Client” and “Active.”
- Site (without the http:// or https:// prefix) & Company ID: enter your ConnectWise site and company ID, both of which you can find on your ConnectWise login screen.
- Next, click the Find Companies button to download all of the sites for clients matching the company type and status you previously entered. Depending on the number of clients and client sites you have, retrieving this information via the API can take a bit of time (sometimes up to 20-30 seconds), so be patient!
- Next, enter your company’s address in the field provided, select whether you’d like distance calculated in miles or kilometers and click the Calculate Distances button.
- Once calculated, the distances will appear in the record grid above as a new column.
Updating your ConnectWise database
Unfortunately, ConnectWise does not provide access via the API to the field that stores the default mileage reimbursement distance for company sites. This was a disappointing discovery while I was working on the project as it would clearly make more sense to update the client sites using the API once the distances are calculated.
To get around this, I decided to generate a series of SQL update statements that you can use to load the distances calculated by the tool into your ConnectWise database. Sadly, this last – and arguably most important step – is something only on-premise partners will be able to do.
Lessons learned
I decided to undertake this project, in part, because I was eager to get more hands-on experience using the ConnectWise APIs. Here are a few things that I learned along the way:
- The ConnectWise APIs are limited in what they can do compared to direct database access or what a user can accomplish through the UI. Perhaps this is an obvious statement, but for this project it resulted in two less-than-desirable outcomes:
- First, the API doesn’t provide (or I couldn’t find) an interface through which I could retrieve configuration information stored in the setup tables. This is why you have to enter the company type and status as text rather than being able to select them from a drop-down menu (which would clearly provide a better user experience). This seems like a rather significant architectural deficiency since providing statuses, types, etc. are required in order to retrieve data via the API in an efficient manner.
- Second – and more specific to this particular project – the API also doesn’t provide access to the field that’s used within the system to store the default mileage reimbursement distance, so there was no way to update each client site with its distance using the API, which would have been a much more seamless solution.
- Working with the data using the web services and XML tools present within .NET required significantly less work and code than using a more traditional SQL and typed dataset approach. When I briefly started to re-work the entire calculator to interface directly with the ConnectWise SQL database (given the limitations I mention above), I quickly ran into a number of hurdles that were going to require a significant amount of work to resolve (most of which had to do with building the application so that you could download it and use it in your specific ConnectWise and SQL environment).
- Not all ConnectWise servers respond in the same way or the way your application might expect – even when they’re the same version. I observed a number of anomalies in the way that various on-premise and cloud-based ConnectWise servers responded to SOAP requests while build and testing the tool. This clearly has development, testing and support implications for companies developing against the APIs.
Please let me know what you think about this article and the client distance calculator by leaving a comment below!

