How to set up Office 365 calendar syncing for cloud partners
We recently migrated nexnow.net to Office 365 and I found the online documentation that ConnectWise provides on setting up calendar syncing with Office 365 incomplete. Here’s what we had to do to get this set up for us. Keep in mind that these instructions are specific to cloud-based partners.
Step 1 – Contact ConnectWise
The first thing you’ll need to do is send an email to install@connectwise.com and let them know you’d like to enable calender syncing with Office 365. The install team will assign you the Office 365 Calendar Integration form in the University that you’ll need to complete. Details on completing this form follow.
Step 2 – Create Office365 account for CWadmin
Next, create a login account for ConnectWise:
- Log in to Office 365.
- In the left-hand navigation under Management, click Users.
- Click New > User.
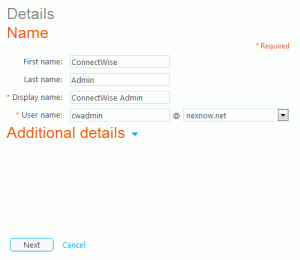
- On the Details screen, enter the following:

- First Name: ConnectWise
- Last Name: Admin
- User name: cwadmin
- @: select the domain your company uses for email as ConnectWise will assume the full username is cwadmin@yourdomain.com
- Click the Next button.
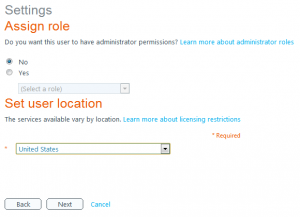
- On the Settings screen, select the following:

- Assign role: No
- Set user location: United States
- Click the Next button.
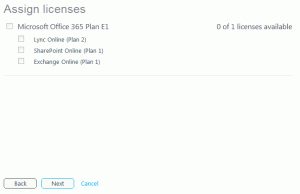
- On the Assign licenses screen, don’t assign any licenses and click the Next button again.

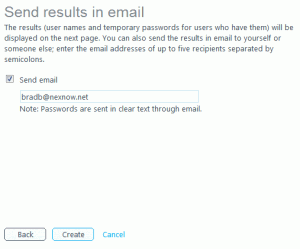
- On the Send results in email screen, leave Send email checked and enter your email address in the field provided (if it’s not already there).

- Click the Create button.
Using the User name and Temporary password provided on the Results screen or in the New or modified user account information email that you’ll receive from Microsoft, log in to Office 365 to establish a permanent password for the new CWadmin account. Make sure you write down the permanent password as you’ll need it in step 4.
A note about assigning an Office 365 license: ConnectWise Support has insisted that a mailbox license is required for calendar syncing to work, but I have tested it without a license and everything appears to work just fine. I’ve asked for further detail about why a license would be required, buy the support folks haven’t provided any detail as of yet. (Updated 29 Apr 2014)
Step 3 – Download PowerShell
You’ll need to download and install the following before you’ll be able to complete step 4:
- Microsoft Online Services Sign-In Assistant (IDCRL7)
- Microsoft Online Services Module for Windows PowerShell.
Both of these can be downloaded here.
Step 4 – Grant mailbox permissions
Similar in concept to how permissions are granted for an on-premise Exchange installation, you’ll need to grant the CWadmin account (created in step 2) permission to all of the mailboxes in your organization. Enter the credentials of an Office 365 account with administrator permissions when prompted by the script.
- Click Start > All Programs > Accessories > Windows PowerShell.
- Right click Windows PowerShell and select Run as administrator.
- Execute each of the following commands (or download this script):
Set-ExecutionPolicy RemoteSigned

$LiveCred = Get-Credential

$Session = New-PSSession -ConfigurationName Microsoft.Exchange -ConnectionUri https://ps.outlook.com/powershell/ -Credential $LiveCred -Authentication Basic –AllowRedirection

Import-PSSession $Session

Get-Mailbox |% {Add-MailboxPermission $_.Name -User “cwadmin” -AccessRights FullAccess;}
Step 5 – Enable calendar sync
Next, enable calendar syncing in ConnectWise for your members:
- Navigate to Setup > Members.
- Under the Calendar Sync Integration Information section, check Turn on Calendar Sync Integration and enter the member’s mail Office 365 email address in the MAPI Name field.

- Click the Save icon.
Step 6 – Complete the Office 365 Calendar Integration form
Once you’ve completed the previous steps, ConnectWise has responded that they’ve assigned you the Office 365 Calendar Integration form in the University, here’s what you do next:
- Access the Office 365 Calendar Integration form in the University.
- Scroll down and complete the fields provided. Enter the permanent password for the CWadmin account you created in step 2 in the Exchange User Password field.
- Click the Save button.
The ConnectWise installation team should have everything they need to set up and testing calendar syncing with Office 365.
Going Forward
You’ll need to repeat steps 4 and 5 each time you add a new mailbox to your Office 365 account. For this, I’ve created a handy Office365 CWadmin PowerShell Script that contains the PowerShell commands listed above. Be sure to this script with local administrator permissions.
Resources
- The Office 365 Calendar Sync Setup – Cloud topic in the 2012.1 online documentation.