Setting up LDAP authentication for ConnectWise 2012.1 – it’s easy!
One of the features ConnectWise has just released as part of 2012.1 is LDAP integration. This allows your users to use the same username and password to log in to ConnectWise as they use elsewhere in your network.
Overview
LDAP stands for Lightweight Directory Access Protocol and is simply a protocol that applications can use to look up and authenticate users, among other things. ConnectWise can now use this protocol to communicate with your domain controller to validate usernames and passwords. The benefits of using LDAP integration with ConnectWise include:
- Allowing your users to use the same username and password they’re already familiar with and accustomed to using elsewhere in your network.
- Extending your password complexity and account lockout policies to ConnectWise.
- Allowing you to manage user accounts in one, centralized place (Active Directory), including the ability to disable a user’s access to ConnectWise by disabling his or her account in Active Directory.
Important details
- ConnectWise LDAP integration is only available for on-premise partners.
- You’ll need to install the latest version of the ConnectWise client.
- While users will be able to use their network username and password, they’ll still have to enter these in the ConnectWise Login screen. This is because ConnectWise does not (yet?) support single sign-on.
- Once LDAP integration is configured and turned on, your users will no longer manage their passwords in ConnectWise.
- ConnectWise recommends that you enable and test LDAP authentication on just one member account before rolling it out to all members, so that you don’t accidentally lock all users out of the system.
Set up LDAP integration
The first thing you’ll need to do is configure ConnectWise to connect to your LDAP server.
- Navigate to Setup > Setup Tables > LDAP Integration.
- Click the New icon.
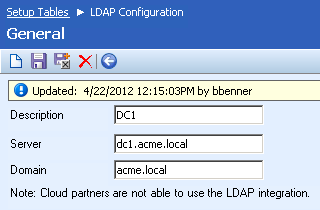
- Enter the following information in the fields provided:
- Description: enter a description for the LDAP configuration, such as the domain controller’s name.
- Server: enter the FQDN (fully qualified domain name) of your domain controller.
- Domain: enter the domain to which the domain controller belongs.

- Click the Save icon. If ConnectWise is unable to reach your domain controller using the information you provided, you’ll receive an error after clicking the Save icon.

- Navigate to Setup > My Company.
- On the Owner tab under Other Miscellaneous Setup Options, select the LDAP configuration you just created from the Default LDAP Configuration drop down.

- Click the Save icon.
Activate LDAP authentication
Once you’ve set up and enabled LDAP authentication, you’re ready to activate it for your members.
- Navigate to Setup > Members.
- Find and select the member for which you would like to enable LDAP authentication.
- On the Details tab under LDAP Configuration, click the Enable LDAP Authentication check box.
- Enter the user’s Active Directory user name in the LDAP Username field.

- Click the Save icon.
- Rinse and repeat for each member for whom you would like to enable LDAP authentication.
Resources
- The LDAP Configuration Setup Table topic in the 2012.1 online documentation.
- The LDAP Setup how-to video. Run time: 6:41.
Let us know what you think of ConnectWise’s new LDAP integration by leaving a comment below.