3 steps to adding a human touch to ConnectWise emails
One of the challenges many MSPs face is finding that delicate balancing point between automating service delivery while also not losing that personal touch clients appreciate.
As I wrote in a recent post, the latest release of ConnectWise includes an option for using your staffs’ names as the name displayed in emails sent from service and project boards. When you pair this enhancement with a few features that already exist within Connectwise, you end with a really great way to add a personal touch to the emails your clients receive. Here’s how to set it all up:
1. Have your staff create a ConnectWise signature
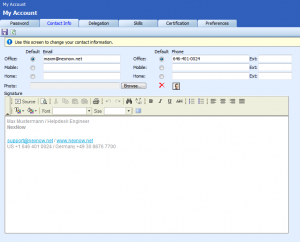
The first thing you’ll need to do is have each member create a signature within ConnectWise:
- Navigate to Other > My Account > Contact Info.
- Use the Signature field to either copy in your company’s existing HTML email signature, or to create a new signature using the field and the formatting buttons provided.
Note: Unlike Outlook, embedding images in your ConnectWise email signature requires a few extra steps. You’ll first need to upload the image(s) you’d like to include in the signature to a publicly accessible web server. Next, click the Source button and add the appropriate HTML <img> tag(s). Click the Source button again to see how the signature will display with the images.
2. Update your service board email templates
The next step is to add the [membersignature] token to your service board email templates.
- Navigate to Setup > Setup Tables > Service Board.
- Select the service board you’d like to update.
- Click the Statuses tab and find the status you’d like to update.
- Scroll down to the Email Template Setup section and find the Body field that contains the HTML editing tools.
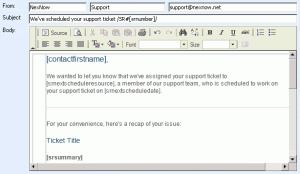
- Find an appropriate place within your email template and insert the [membersignature] token.
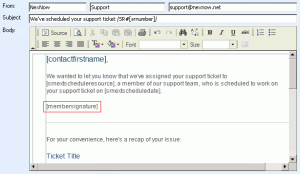
- Scroll back up and click the Save button.
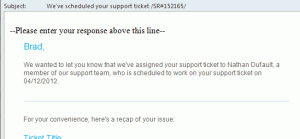
Here’s how the email appears without the [membersignature] token:
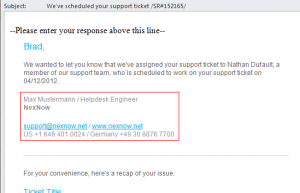
And here’s how it appears with the token:
3. Turn on ‘Use Member Name as Display Name’
The last step is to turn on the new Use Member Name as Display Name feature released with ConnectWise 2012.1. To do this, simply follow the instructions I posted last week.
How has your company set up ConnectWise to create a more personalized experience for your clients? Let us know by leaving a comment below!
Want to do more?
Do you want to do more with your ConnectWise? Contact us for one-on-one help or connect with us on the ConnectWise subreddit or the ConnectWise University Forums.
